Create a PWA from a Phaser Game Using Workbox
Note: The bulk of this post should still apply today since it covers how to build a PWA using open source tools. However, I wrote this post in relation to a web service called Superweb.app I built and have since taken down that was intended to make it easier to build PWAs.

Creating an offline-first progressive web app (PWA) has never been easier, but it’s still pretty hard. In this post, we’ll go over how you can convert a Phaser-based game into an offline PWA using tools like Google’s Workbox and Workbox Window. When we’re done, we’ll have a game that 1) works even when offline and 2) can be installed onto the iOS home screen, the Android home screen, and desktops via Chrome.
After describing how to manually stitch together these components together to create a PWA, we’ll then show how you can use Superweb.app to automatically create a PWA without having to worry about all this boring stuff.
Here’s a list of the things we’ll go over:
- Tools, technologies, and terms
- Creating a service worker (SW)
- Registering the SW and showing the user a “refresh” button when the app is updated
- Creating a web app manifest
- Dealing with icons
- Serving with HTTPS
- HTTP cache headers
Tools, Technologies, and Terms
There are a bunch of components that go into creating a PWA. In this section, we’ll briefly describe a few of the bigger ones.
What is a PWA?
A PWA is a web-based app built using best-practices that can significantly improve the user experience (e.g. the ability to work offline). For many apps (and games specifically), these features can elevate the web-based experience such that the additional benefit native platforms provide is negligible. On top of that, the ease of deploying apps to the web makes it quicker to ship new features to your users, and the fact that you need not provide a cut of your sales to an app store means you get to keep more of what you earn.
What is a Service Worker?
Service workers are the key piece of web technology that enables us to create PWAs. Service workers can do a lot of things, but we’ll only cover a single use case in this post. If you’re interested in learning more, Google has a pretty nice write up here to get you started.
Long story short though, service workers are a browser API that enables developers to (among other things) cache assets (images, JS files, etc.) for when the user offline. More specifically, they live in a completely separate context from your web app (e.g. in your web app context, self === Window while in the service worker context, self === ServiceWorkerGlobalScope) and can intercept HTTP requests from your app.
What is Workbox and Workbox Window?
The service worker API is great, but its complexity can make it difficult to work with on its own. To make things easier, Google has created the Workbox and Workbox Window libraries to provide a simpler API aimed at helping developers handle the most common service worker tasks.
What’s the difference between Workbox and Workbox Window? It’s helped me to think about these two libraries as representing the two contexts involved when building PWAs: Workbox generates the service worker that lives in the service worker context and Workbox Window lives in the web app context and handles the stuff that occurs there (e.g. showing the UI when the app is ready to update).
Also, Workbox and Workbox Window aren’t the only way to create service workers. For reference, here’s a link to a tutorial that creates a service worker for a Phaser game without any libraries.
What is a Web App Manifest?
The Web App Manifest is a JSON file that contains information about our app such as its title, icon, and description. This file is used by browsers to make web apps “installable” on smartphone home screens or desktops so that launching your web app feels like launching a native app.
What is Phaser?
Phaser is a popular open source Javascript-based 2D framework. Phaser reduces the boilerplate required to make a canvas-based game, and we’ll use it here to put our game together.
What is Precaching?
Our PWA will “precache” assets so they’re available when the user is offline. In our case, we’re mostly just precaching the image of Croissant the cat. However, if your game was more complex, you might want to precache other things like images, audio files, or 3D models the user has not yet seen. The advantage of precaching files is 1) the files are available when the user goes offline and 2) the files are retrieved without the user explicitly asking for them so they’ll be available from the cache when the user does eventually ask for them.
Our Game: Cat Tap
As an example, I put together this small game call Cat Tap. Here’s a link to the source code for both the basic and PWA version of the game. I also deployed the game to Superweb.app here.
The goal of the game is to see how many times you can tap on Croissant before her icon hits the ground. I think my best score is around 27…
Steps to Create a PWA
Google provides this handy PWA checklist that goes over attributes a PWA should have. Below, I’ll go over a more specific list of things we’ll do to convert the Cat Tap game into a PWA.
We’ll know we’ve done a good enough job when Chrome will let us install the game onto our desktop.
Creating our SW with workbox-cli
There are several ways you can generate service workers using Workbox. For this post, we’ll go over using workbox-cli. First off, you’ll want to install it with NPM or Yarn:
npm install workbox-cli --global
Or
yarn global add workbox-cli
After that, we need to 1) run the Workbox Wizard to create our config file and 2) run the command to generate a service worker.
To run the wizard, type workbox wizard from the root directory. If you’re following along by building on the basic Cat Tap app, you would type the command from within the basic/ directory.
You’ll be asked a bunch of questions, but the good news is you can mostly follow the defaults. We’ll use app as the root directory, keep all the file types listed for precaching, use app/sw.js as the service worker file, and workbox-config.js as our config file.
When you make it through the wizard, you’ll be shown the command to use to generate the service worker: workbox generateSW workbox-config.js.
When you type the above command, Workbox will look for files to precache and populate a list of these files in app/sw.js. In fact, go ahead and take a look at app/sw.js–you should see a section that looks like this:
self.__precacheManifest = [

  {

    "url": "assets/croissant.png",

    "revision": "164ef686cae1774929e0017afc103724"

  },

  {

    "url": "assets/icon144.png",

    "revision": "8586225346587f1abb83d5a6a1f79f6c"

  },

  {

    "url": "index.html",

    "revision": "b4f629b52fc630640da57af21a410b07"

  },

  {

    "url": "lib/phaser.min.js",

    "revision": "37faafc9439e5eff625f9cc531a681ed"

  },

  {

    "url": "manifest.webmanifest",

    "revision": "5fb260282f7c71c6d0c1acacd0f10076"

  },

  {

    "url": "src/index.js",

    "revision": "a7291c50ad5086abcc3ae637116a2ff5"

  }

].concat(self.__precacheManifest || []);
The above files will be downloaded right away as the app loads and available to your app even when the user goes offline. Note that Workbox will take care of generating sw.js for you so you won’t have to modify this list on your own.
Registering the SW and Showing a “Refresh” Button
If you’re not going to show users a UI to refresh the app when a new version is available, you can probably ignore this section and the Workbox Window library entirely. In that case, Workbox’s getting started tutorial will guide you in registering your service worker.
However, if you’re interested in implementing the refresh-to-update pattern, you’ll need to bring in Workbox Window or build something similar on your own. This process is described somewhat abstractly in Workbox Window’s advanced recipe section. Below we’ll provide a complete implementation.
First we need to add the following code to the bottom of our index.html:
<script type="module">

  import { Workbox } from "https://storage.googleapis.com/workbox-cdn/releases/4.3.1/workbox-window.prod.mjs";

  if ("serviceWorker" in navigator) {

    const wb = new Workbox("/sw.js");

    const refreshBoxHiddenClassName = "superwebapp-refresh-box-hidden";

    wb.addEventListener("waiting", (event) => {

      const refreshBox = document.getElementsByClassName("superwebapp-refresh-box")[0];

      const refreshButton = document.getElementsByClassName("superwebapp-refresh-box-refresh-button")[0];

      const closeButton = document.getElementsByClassName("superwebapp-refresh-box-close-button")[0];

      refreshBox.classList.remove(refreshBoxHiddenClassName);

      refreshButton.addEventListener("click", () => {

        wb.addEventListener("controlling", (event) => {

          console.log("[Superweb.app] Reloading to get newer version of app...");

          refreshBox.classList.add(refreshBoxHiddenClassName);

          window.location.reload();

        });

        wb.messageSW({ type: "SKIP_WAITING" });

      });

      closeButton.addEventListener("click", () => {

        refreshBox.classList.add(refreshBoxHiddenClassName);

      });

    });

    wb.register();

  }

</script>
And then add the refresh UI inside the <body> tag in our index.html file:
<div class="superwebapp-refresh-box superwebapp-refresh-box-hidden">
A new version is available
<button class="superwebapp-refresh-box-refresh-button">REFRESH</button>
<button class="superwebapp-refresh-box-close-button">✕</button>
</div>
Here’s the styles for the refresh box, which you can place anywhere in your index.html file:
<style>
.superwebapp-refresh-box {
  background-color: rgba(0, 0, 0, 0.7);
  border-radius: 5px;
  bottom: 10px;
  color: #fff;
  display: inline-block;
  left: 50%;
  padding: 10px;
  font-family: Arial, Helvetica, sans-serif;
  font-size: 16px;
  position: fixed;
  transform: translateX(-50%);
  white-space: nowrap;
}

.superwebapp-refresh-box-hidden {
  display: none;
}

.superwebapp-refresh-box-refresh-button {
  background: none;
  border: none;
  color: #6699ff;
  font-family: Arial, Helvetica, sans-serif;
  font-size: 16px;
}

.superwebapp-refresh-box-refresh-button:hover {
  color: #3377ff;
  cursor: pointer;
}

.superwebapp-refresh-box-close-button {
  background: none;
  border: none;
  color: #fff;
  font-family: Arial, Helvetica, sans-serif;
  font-size: 16px;
  margin: 0;
  padding: 0;
}

.superwebapp-refresh-box-close-button:hover {
  cursor: pointer;
}
</style>
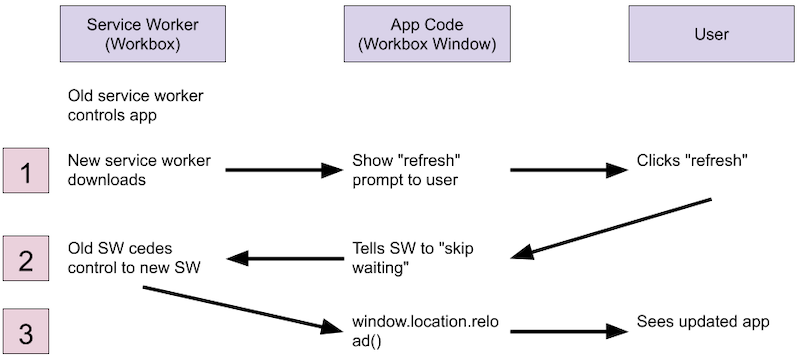
The wb.register() part of the code is what tells the browser we’d like /sw.js to be our service worker. Almost everything else in the above two snippets is there to detect when a new service worker is installed and let the user know a new version is available.
Specifically, the superwebapp-refresh-box UI element is hidden until Workbox Window is told that there is a service worker “waiting” to be activated. When that happens, superwebapp-refresh-box is displayed. If the user clicks or taps on “refresh”, a message is sent to our service worker to “skip waiting” (wb.messageSW({ type: "SKIP_WAITING" });), which is just a funny way of telling the new service worker it has permission to take over control of the app from the old service worker.
After that, Workbox Window waits until it receives a “controlling” event that signals to our app that the new service worker is indeed in control. At that point, we manually reload the app, and the user now sees the latest version of the app.
Congratulations on making it this far! This is the most confusing part of this whole process, so it gets easier from here on out. Here’s a diagram of the whole process in case it’s handy:
If you’re interested in learning more about the service worker lifecycle and why this is all so complicated, check out Google’s article here.
Create the Web App Manifest
There are a bunch of fields you can fill out in the Web App Manifest, but we’ll just fill out the fields necessary to allow Chrome to “install” our app to the desktop. Check out the list of other fields here. Save the following file to app/manifest.webmanifest:
{

  "start_url": ".",

  "display": "standalone",

  "name": "Cat Tap!",

  "short_name": "Cat Tap!",

  "description": "Tap Croissant to keep her in the air!",

  "icons": [

    {

      "src": "assets/icon144.png",

      "sizes": "144x144",

      "type": "image/png"

    }

  ]

}
Two fields that aren’t super self-explanatory are start_url and display. start_url tells the browser what URL to use when the user opens the app. In most cases, . will probably make the most sense. display tells the OS what browser UI to show when the app is launched from a home screen or desktop. standalone removes the browser UI and makes the app feel the most native of all the options available.
Once you have the manifest created, you can link to it in your index.html file by adding the following line in the <head>:
<link rel="manifest" href="/manifest.webmanifest">
Adding Icons
For Chrome and Android devices, the Web App Manifest is all you need to have your app’s icons show up properly on a home screen or desktop. However, Apple makes things a bit more difficult because it currently (as of iOS 12.2) doesn’t pull icons from the manifest (see this great article on PWAs in iOS for more info). As a workaround, we can add the following lines to the <head> of our index.html:
<link rel="shortcut icon" type="image/x-icon" href="/assets/icon144.png" />

<link rel="apple-touch-icon" href="/assets/icon144.png">
Serving on HTTPS
If you’ve been developing and testing on your localhost, you may get the impression that HTTPS is not required to use service workers. However, localhost is an exception to the rule–when you put your app or game online, you will need to make sure your site is served via HTTPS or the service worker will not install.
Fortunately, there are great services like Netlify, Surge, and of course Superweb.app that will make sure you’re all set from and HTTPS point of view.
Set Headers to Not Cache Your sw.js File
One of the more frustrating aspects of service workers is that it’s totally possible to get your app into a state where it’s difficult to push an update to users if they have a busted version of your app. Fortunately, the Chrome team has also made some changes to their browser to make getting locked out less likely.
However, in order to make sure you’re always able to push out a new version of your app, make sure the service worker is sent from your server with the Cache-Control: max-age=0 header.
Deploying with Superweb.app Is Way Easier
Whew! Doing the above is a lot of work. And if you’re configuring your PWA manually, this isn’t all you’ll be responsible for–you’ll also want to come up with a system to make sure you can deploy and rollback your app, find a way to preview your app before it’s deployed, etc.
If you use Superweb.app, all this is done for you. In fact, here’s a real-time GIF of what the whole process looks like to upload a new version of Cat Tap:
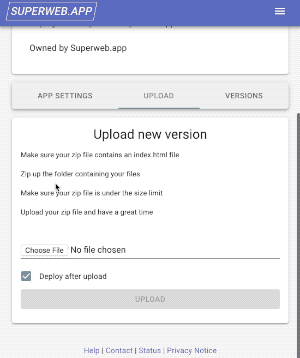
In comparison to all the work required to manually create a PWA, with Superweb.app, the steps are 1) zip up your app, 2) upload your app, 3) your app is ready. You can create a free Superweb.app account here.
Install the PWA from Chrome
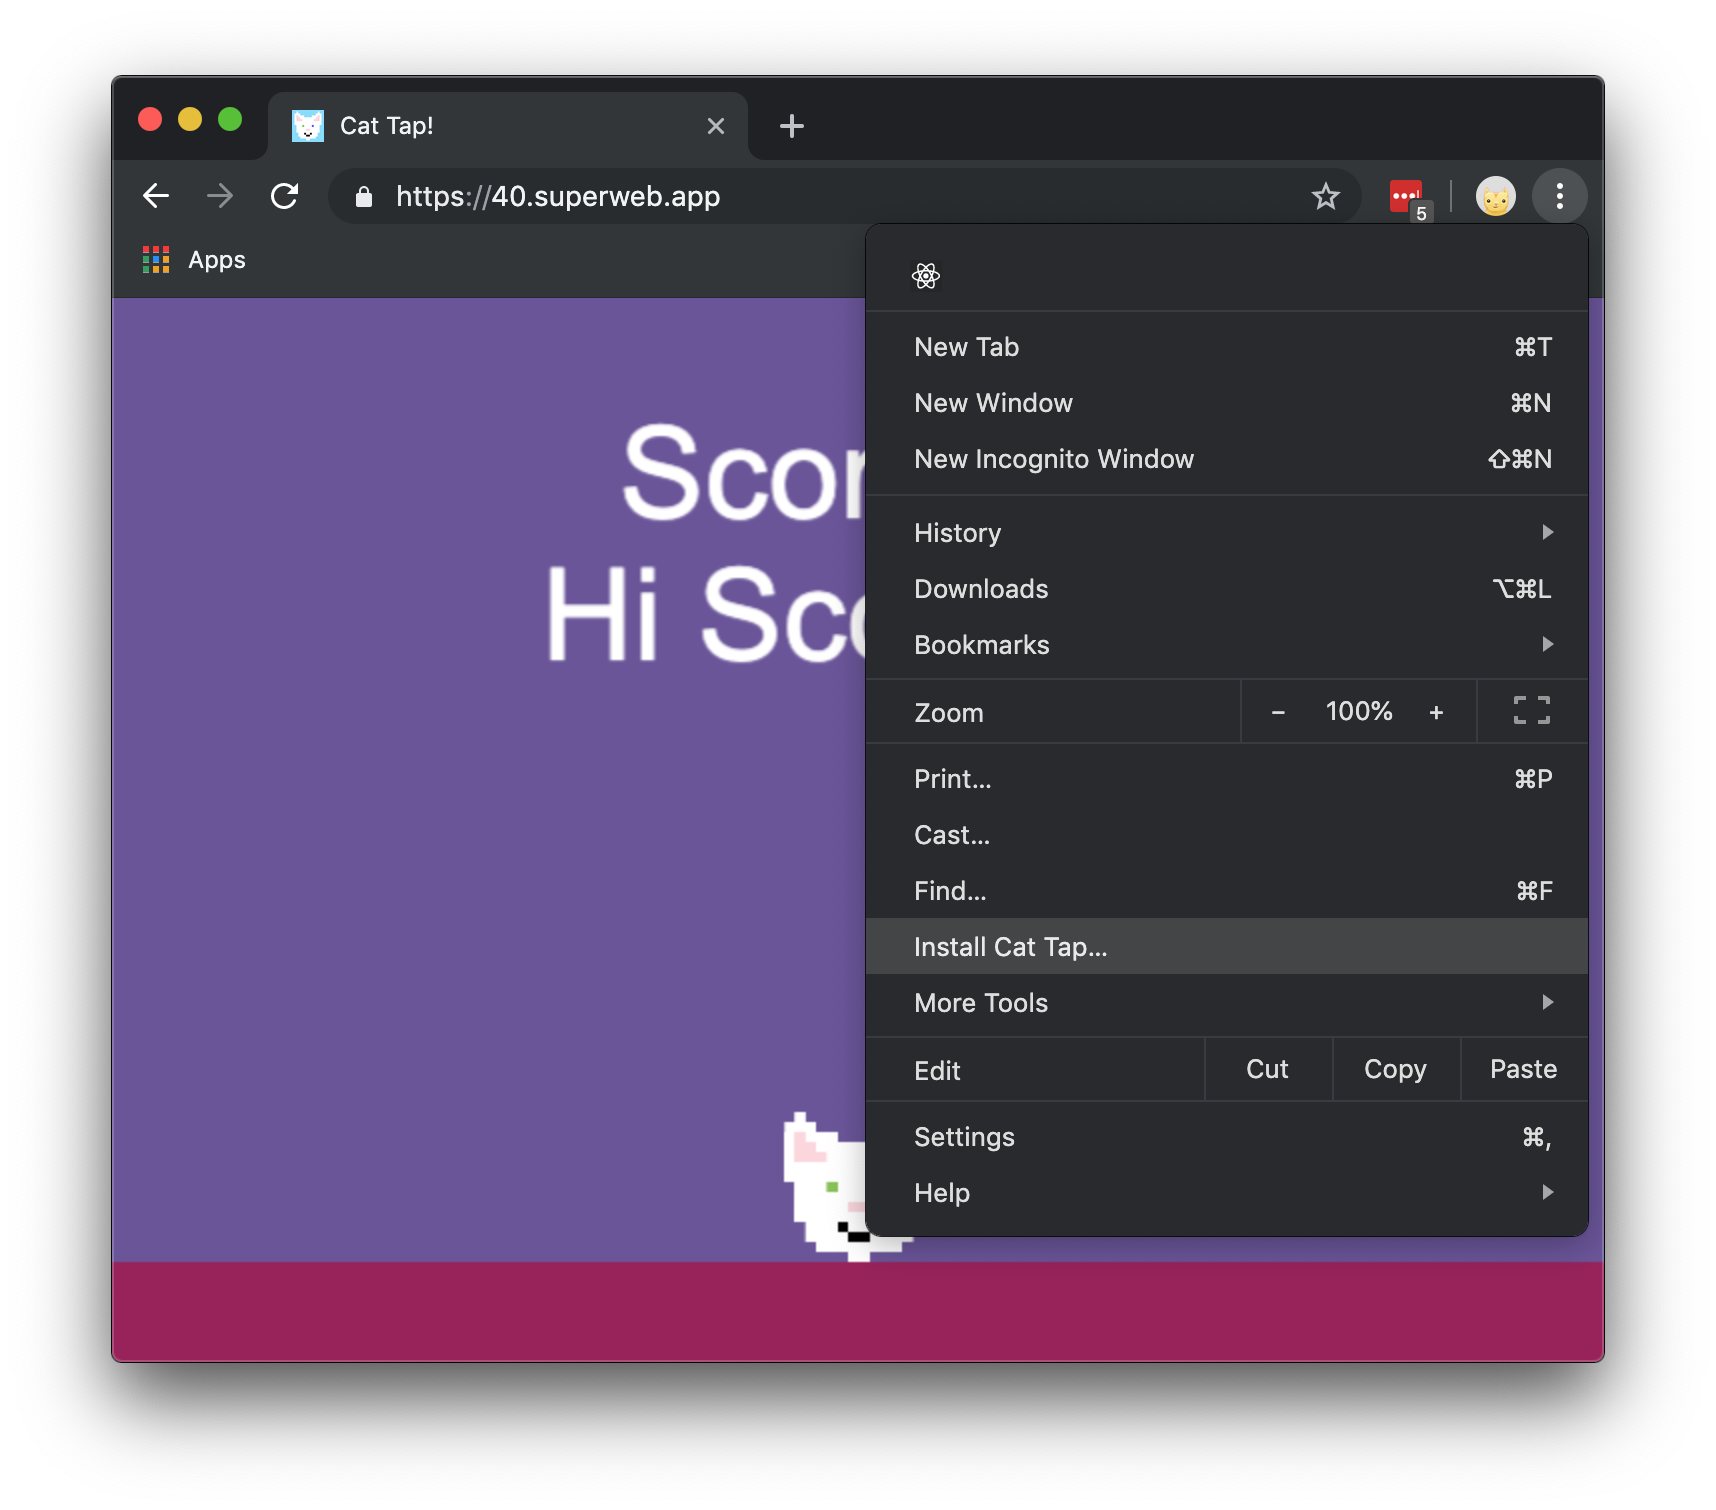
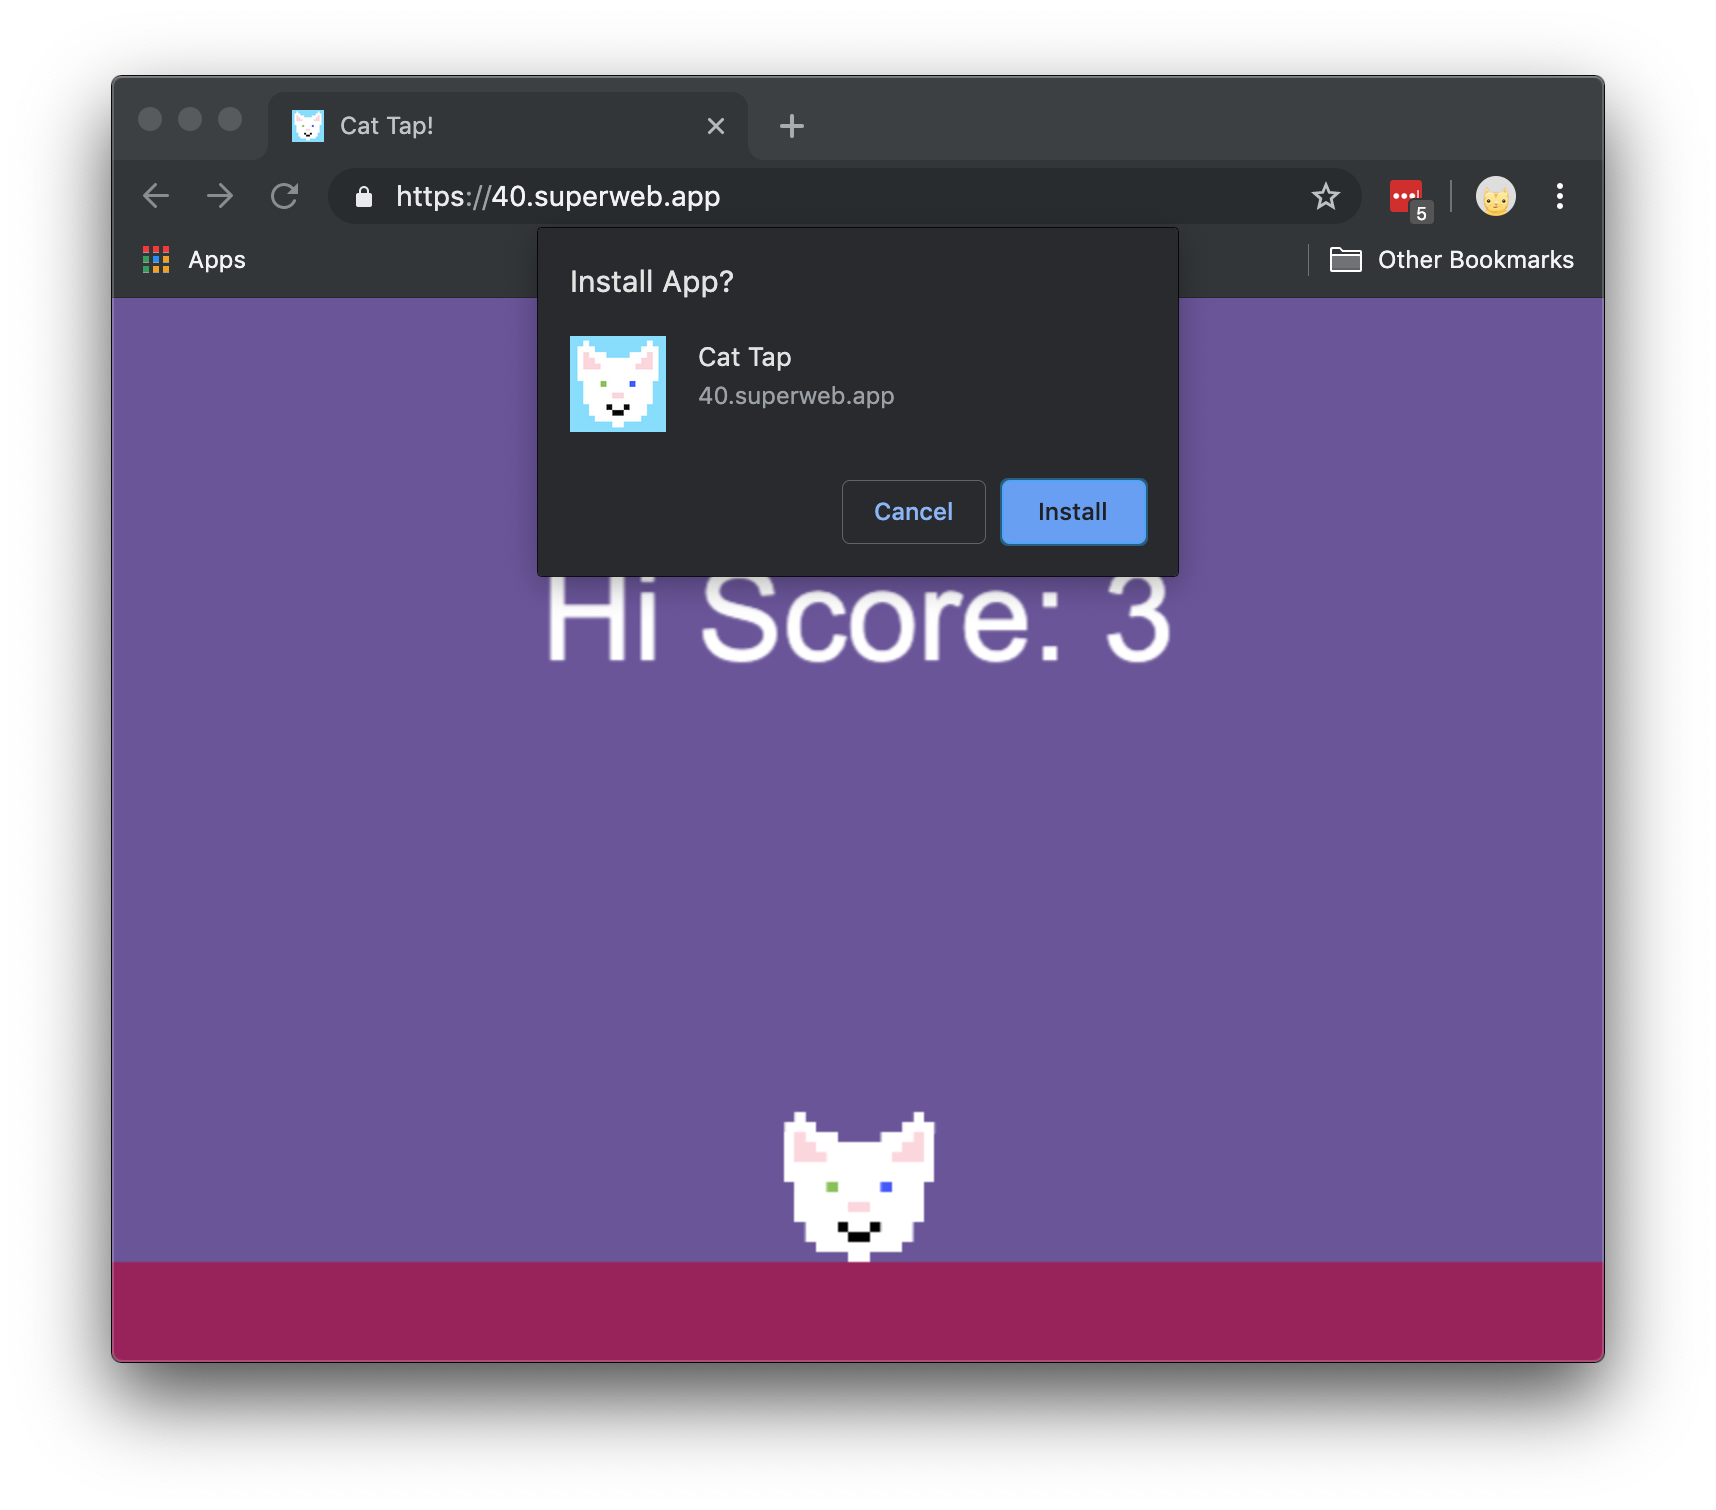
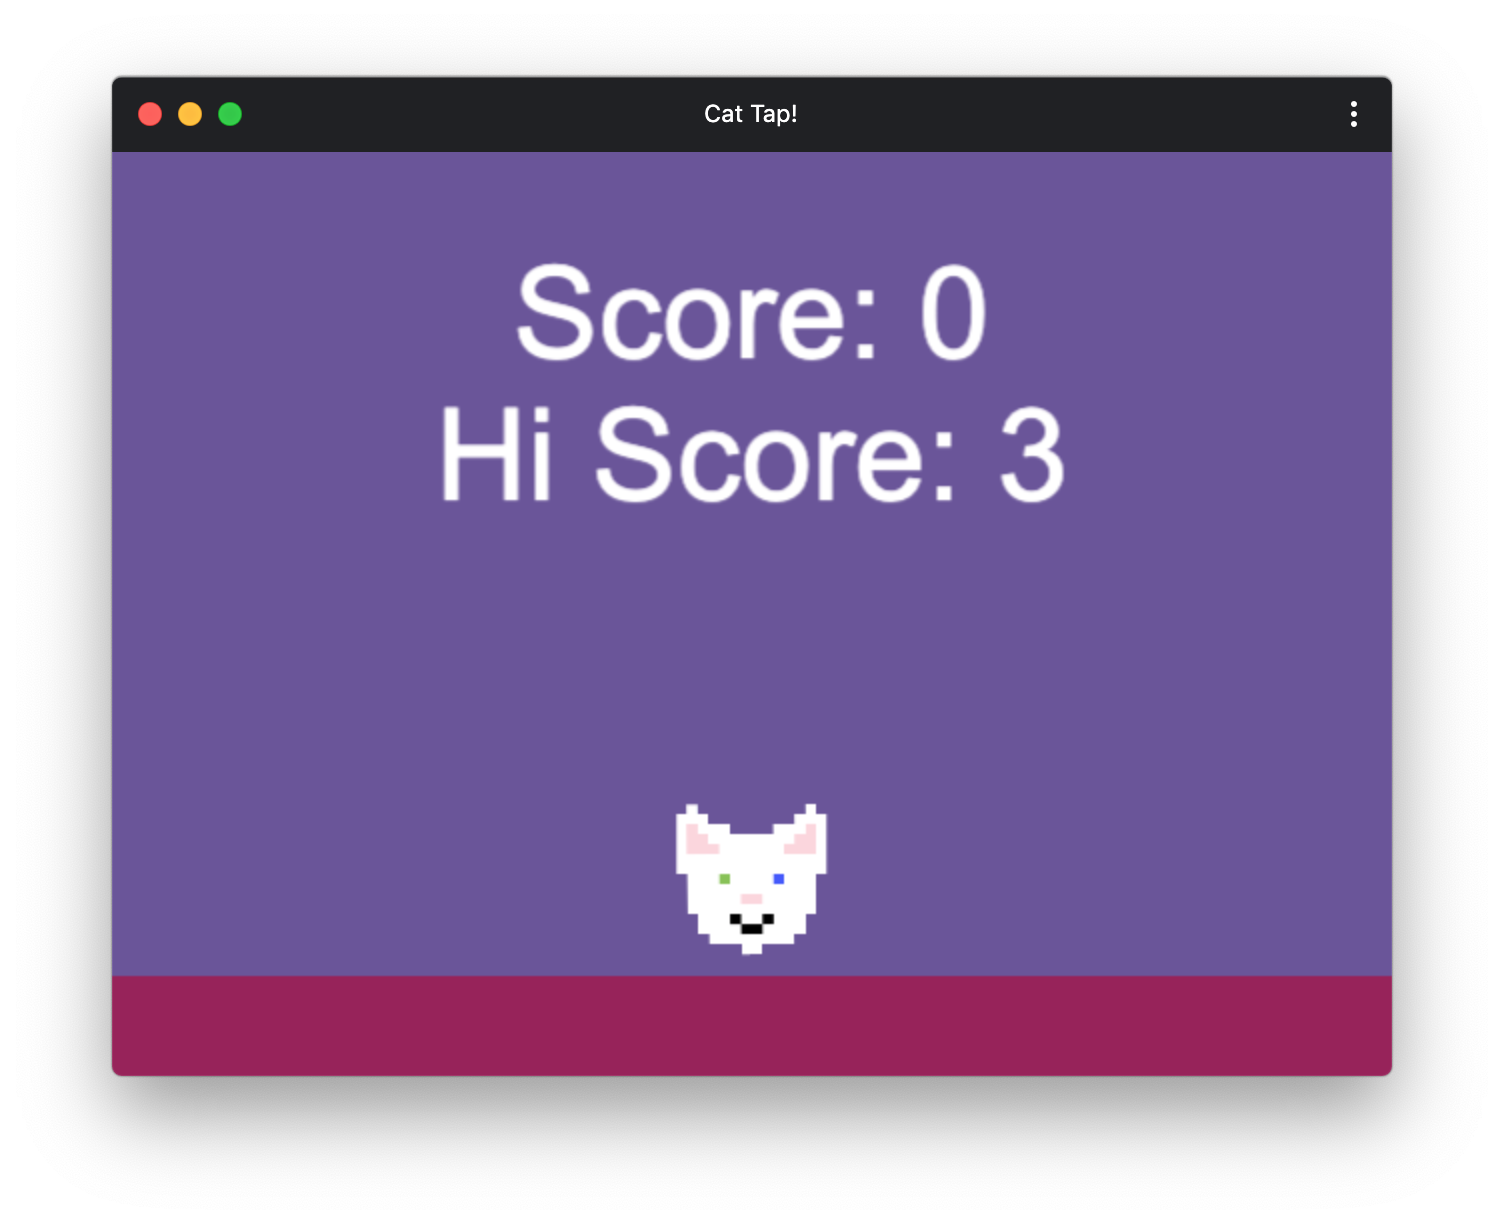
Chrome now allows users to install PWAs and launch them like native apps. To try this out with Cat Tap, go to the deployed game here in Chrome, click on the three-dots menu, and select “Install Cat Tap”. After that, Chrome creates an icon in the “Chrome Apps” folder that you can click on to launch the game like a native app. I’ll post some screenshots below.
I hope this post was helpful–Please let us know if you have any thoughts or feedback!